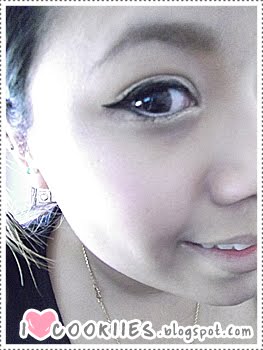
Hey Guys!
I've finally finished taking pics for this tutorial yesterday, but was interrupted by dinner plans and catch up sesh with my cousins last night I couldn't write up the tutorial!
So this look is from T-Ara Hyomin's Roly Poly look below...

 Her eye make up close up (left), Her comeback performance - the picture flushed out her red lipstick (right)
When I first saw their first Roly Poly comeback performance, I was mesmerized by how gorgeous she looked and how her make up was so simple made her look like a goddess (totally girl crushing).
So let's get on with the tutorial shall we?
Please note that I'll only be showing you how to do her eye makeup.
WARNING! PHOTO SPAM AHEAD!
What I've used in this Tutorial:
♥ Olive (Wings) Brown Circle Lens (GEO)
♥ Apricot Frost Creme Shadow (no brand)
♥ Anaconda Super Silky Shadow (no brand)
♥ 425 Dawning Gold (Max Factor)
♥ Killer Black Pen Liner (CLIO)
♥ Zero Black 24/7 Glide-on Pencil (Urban Decay)
♥ 071 Pure White Soft Kohl Eye Liner (Rimmel)
♥ Black Super Dolly Powerful Mascara (SASA)
♥ Ultra Black The Max VolumeFlash Mascara (Rimmel)
♥ Blaze Red Lipstick (no brand)
Apricot Frost (left), Applying from top lash line to crease (right)
1. After you do your basics (foundation, conceal, blush, contour), grab a shimmer peachy/apricot colour creme shadow to use as your base. I've been going to this beauty clinic which sell these no brand make up and it's THE BEST (it's long lasting, doesn't wear off too fast which is great), for this first step, I'm using their "
Apricot Frost" creme shadow which gives off a shimmer effect with tints of peach/apricot colour. Start applying on your lids (generally from your lash line to your crease.. if you have smaller lids, going above your crease is fine).

 Anaconda (left), Patting on the eye shadow with one finger (right)
2. Next, using your finger lightly pat a light taupe colour on top so that the base is not too shimmery. We're not going to smudge it on or glide it on, a simple dab on the lid is fine (don't over do it.. we're just dimming down the shimmer).

 Max Factor Dawning Gold (left), Gliding on eyeshadow up to crease (right)
3. Lastly, a gold eye shadow to make your eyes have a hint of gold colour.. I'm using Dawning Gold by Max Factor, in the picture above, the eye shadow comes with a light gold colour as well as a medium bronze colour (we're obviously going to use the gold). Another light pat on the lid would be the best way to go... If you can not see your gold, apply more gold eye shadow by doing light and short smudges. Using the gold, glide it towards your inner corners.

 CLIO Killer Black Pen Liner (left), Drawing the wing about 2.5cm towards eyebrow ends (right)
 Your line should look long (above)
4. Using a thin black liquid eye liner, start lining your eyes as close to your lash line as possible. Make your line about 2mm thick. Draw a wing about 2-3cm towards the ends of your eyebrows. I'm using
CLIO's Killer Black eye liner (the one Lee HyoRi models for).

 Urban Decay 24/7 Glide-on eye liner pencil (left), 0.5cm from wing towards middle of eye - follow the red line (right)
5. Using a black crayon/pencil eye liner, line your inner upper lash line (waterline) to create thick lashes and draw from the lower outer corners of your eye (just under the wing) about 1cm or less towards the middle of your eye. Use a Q tip to smudge the line so that it's not so sharp. I'm using Urban Decay

 Rimmel Pure White eye liner (left), After lining the lower water line (right)
6. Grab your white eyeliner (in this case I'm using Rimmel London) and line the bottom of your water line from your outer corners to about half way to make your eyes appear larger and more brighter.
Smudge and blend the gold underneath your lower lashes (right)
7. Take your gold eye shadow again, and smudge below your lashes from your inner corners towards the center and blend it out.

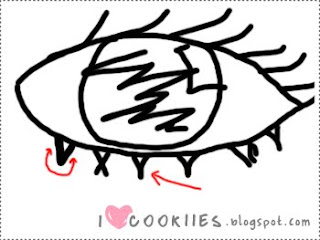 SASA branded mascara (left), My crappy diagram of the lower lashes (right)

 Super happy that I've finished my eyes!!!
8. Here's the tricky part, we wanna join at least 2 of your lower lashes together. It's hard to explain, but refer to my crappy diagram above. It's best to use a dry mascara (on that's nearly finished/run out and preferably on a rubber brush rather than bristles). Reason why it's better to use a dry mascara with a rubber brush is because you won't accidentally put too much mascara on your bottom lashes that your ruin your make up. It's also a lot easier and cleaner to do so using a dry mascara. After doing the bottom lashes, apply mascara on your top lashes like normal with whatever mascara your have (I've used my Rimmel Max Volume Mascara).
 Blaze lipstick on :D
9. Last but not least, apply red/orange/fuchsia lipstick. In the comeback performance, Hyomin wore a Fire Red (hint of orange) sort of colour on her lips which works very well with the makeup. Fuchsia is worn in the second image which also works well - actually, you could pretty much wear whatever colour and it would still match/suit. It's one of those simple make up and could be worn with whatever dress/lipstick colour!
 My result!!!
 A close up - looks silver I know, but it's hard to capture the right colour on camera
 Closer pic of my eye - see the lower lashes? :D
 Used this as my sneak pic on Twitter :P FOLLOW ME PLEASE :D
And that's it! I hope you like the tutorial! Please let me know your thoughts and suggestions, I would really love to hear from you - pretty much give me comments.. I
♥ Comments!
This look is just an inspired look - this most likely not the exact way of how Hyomin's make up artist applied her make up or even the colours used. I'm just improvising with what I have to create a similar look.